Distortion Node
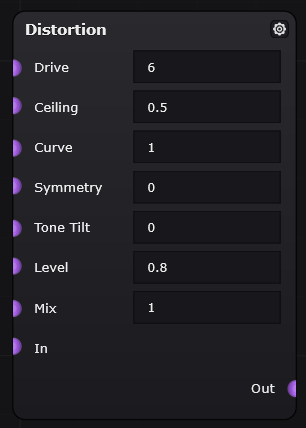
Path: FX > Drive > Distortion
Overview
The Distortion node changes the shape of an incoming audio signal to make it sound more rough, aggressive, saturated, or intense. It works by pushing the signal until parts of the waveform are reshaped or limited.
A key idea behind distortion is audio clipping. Clipping happens when a signal gets pushed past a limit, causing the waveform to be cut off, rounded, or reshaped. This creates the gritty, buzzy, warm, or harsh sound associated with distortion.
At lower settings, distortion can add warmth, thickness, or light grit. At higher settings, it can create harsher, fuzzier, or more extreme sounds.
Fun animation showcasing different types of guitar effects created via distortion: https://youtu.be/Um2fsiQFyYE?si=21ii_ToCWm9JkBJt
Common Uses
The Distortion node can be used to:
- Add grit, edge, or aggression to a signal
- Create guitar-style overdrive, distortion, or fuzz sounds
- Make synths, bass, or drums sound heavier
- Add thickness and harmonic richness to a clean signal
- Create extreme clipped, broken, or experimental effects
Parameters
| Parameter | Unit | Range | Description | Practical Effect |
|---|---|---|---|---|
| Drive | Multiplier | 0 to 40x | Controls how hard the input signal is pushed into the distortion effect. | Higher Drive values create more distortion, grit, and intensity. Lower values sound cleaner and less aggressive. |
| Ceiling | Amount | 0.01 to 5 | Sets the level that the signal is pushed against during distortion. | Lower Ceiling values make the signal distort sooner. Higher values give the signal more room before distortion becomes strong. |
| Curve | Mode | 0 to 4 | Selects the distortion shape used to process the signal. | Different Curve values change the character of the distortion, from sharp clipping to smoother saturation or more unusual folded sounds. |
| Symmetry | Amount | -2 to 2 | Controls whether the upper and lower parts of the waveform are distorted evenly or unevenly. | 0 keeps the distortion centered and balanced. Values farther from 0 create a more uneven, rough, or complex sound. |
| Tone Tilt | Amount | -1 to 1 | Adjusts the brightness or darkness of the distorted sound. | Lower values make the sound darker. Higher values make the sound brighter. |
| Level | Amount | 0 to 4 | Controls the output level after distortion. | Use this to adjust the volume after the distortion effect is applied. |
| Mix | Amount / blend | 0 to 1 | Blends between the dry, original signal and the wet, distorted signal. | 0 outputs only the original signal, 1 outputs only the distorted signal, and values between 0 and 1 blend the two. |
Parameter Behavior
The Drive control is usually the main control for how intense the distortion sounds. Turning it up pushes the signal harder into the distortion effect. This usually makes the sound rougher, thicker, and more aggressive.
The Ceiling control affects how quickly the signal reaches the distortion limit. A lower ceiling gives the signal less room, so it starts distorting sooner. A higher ceiling gives the signal more room, so the distortion may sound cleaner or less intense unless Drive is also turned up.
The Curve control changes the type of distortion. This affects the character of the sound, not just the amount of distortion.
| Curve Value | Curve Type | Beginner-Friendly Explanation |
|---|---|---|
| 0 | Hard clipping | Cuts off the signal sharply when it gets too loud. This usually sounds harsh, bright, buzzy, or aggressive. |
| 1 | Tanh | Rounds off the signal more smoothly. This usually sounds warmer and more natural than hard clipping. |
| 2 | Atan | Also creates smoother distortion, often with a slightly different soft-clipping character than tanh. It can sound controlled, rounded, and less harsh than hard clipping. |
| 3 | Cubic soft | Creates a softer distortion curve that can feel smoother and less extreme. This can be useful for warmer saturation rather than harsh distortion. |
| 4 | Fold | Folds the signal back on itself instead of simply cutting it off. This can create a more unusual, synthetic, or extreme sound. |
The Symmetry control changes whether the top and bottom halves of the waveform are distorted the same way. At 0, the distortion is normally centered and balanced. Moving away from 0 makes the distortion less even, which can add extra character, roughness, or a more unusual tone.
The Tone Tilt control changes the overall brightness of the distorted sound. Lower values make the sound darker and reduce some brightness. Higher values make the sound brighter and can bring out more edge or sharpness.
The Level control changes the volume after the distortion has been applied. This is useful because distortion can make a signal louder or quieter depending on the other settings. After setting Drive, Ceiling, and Curve, use Level to balance the output volume with the rest of the patch.
The Mix control lets you choose how much of the distorted sound you hear compared to the original sound. At lower Mix values, more of the original signal comes through, so the effect sounds cleaner and less intense. At higher Mix values, more of the distorted signal comes through, making the sound rougher, heavier, and more affected by the distortion.
Placement
The Distortion node can be placed in different parts of a patch depending on the desired sound.
| Example Placement | Result |
|---|---|
| After compressor | Creates a smoother and more even distorted sound. |
| Before compressor | Allows the compressor to control volume spikes caused by distortion. |
| Before filter | Lets the filter shape the distorted tone afterward. |
| After filter | Distorts the filtered signal, which can make the filter effect more intense. |
| Before reverb or delay | Keeps the reverb or delay cleaner and easier to control. |
| After reverb or delay | Distorts the reverb or delay tail, creating a more extreme or chaotic sound. |
Example Settings
These settings are starting points and may need adjustment depending on the input signal.
| Use Case | Suggested Settings |
|---|---|
| Light saturation | Drive: 2–5x, Ceiling: 1–3, Curve: 1 or 2, Symmetry: 0, Tone Tilt: 0, Level: 0.8–1.2, Mix: 0.3–0.6 |
| Medium distortion | Drive: 6–12x, Ceiling: 0.5–1.5, Curve: 1 or 2, Symmetry: 0, Tone Tilt: 0, Level: 0.6–1, Mix: 0.7–1 |
| Harsh clipping | Drive: 10–20x, Ceiling: 0.1–0.8, Curve: 0, Symmetry: 0, Tone Tilt: 0.2–0.6, Level: 0.4–0.8, Mix: 0.8–1 |
| Experimental fold distortion | Drive: 8–20x, Ceiling: 0.2–1, Curve: 4, Symmetry: -1 to 1, Tone Tilt: -0.5 to 0.5, Level: 0.4–1, Mix: 0.5–1 |
Troubleshooting
| Problem | Possible Cause | Fix |
|---|---|---|
| The distortion is too harsh | Drive may be too high, Ceiling may be too low, Curve may be too aggressive, or Tone Tilt may be too bright | Lower Drive, raise Ceiling, choose a smoother Curve, or lower Tone Tilt |
| The sound is too quiet or too loud | Level is not balanced after distortion | Adjust Level after setting Drive and Ceiling |
| The sound is too fuzzy or broken | Drive is too high or Curve 4 is creating a strong fold effect | Lower Drive, raise Ceiling, or choose a smoother Curve |
| The distortion is too subtle | Drive is too low, Ceiling is too high, or Mix is too low | Raise Drive, lower Ceiling, or increase Mix |
| The sound is muddy | Tone Tilt may be too dark or Drive may be too high | Raise Tone Tilt or reduce Drive |
| The effect changes volume too much | Distortion is changing the signal level | Adjust Level after setting the distortion character |